Remix is a relatively new web framework that leverages the power of React to build fast, scalable, and dynamic web applications.
Implementing user login in your Remix app is essential for managing access, personalizing user experiences, and securing the application. It helps improve user interaction, protects user data, boosts engagement, and ensures compliance with industry regulations.
In this guide, we will explore how to secure your Remix applications using Asgardeo, including setting up user login, integrating an OpenID Connect based Identity Provider (IdP), and following best practices to safeguard your users.
We will use the create-remix command to generate a new Remix project with a basic template.
npx create-remix@latest
In this guide, we’ll be using TypeScript. However, you can still follow along even if you prefer to use JavaScript. You can use the simpler Javascript template instead.
Once this command is executed, you will be prompted with various configuration options for your application. Provide a name for the project (eg: ./remix-asgardeo-sample) and use the default configuration options for the rest. If everything goes smoothly, your terminal output should resemble the following.
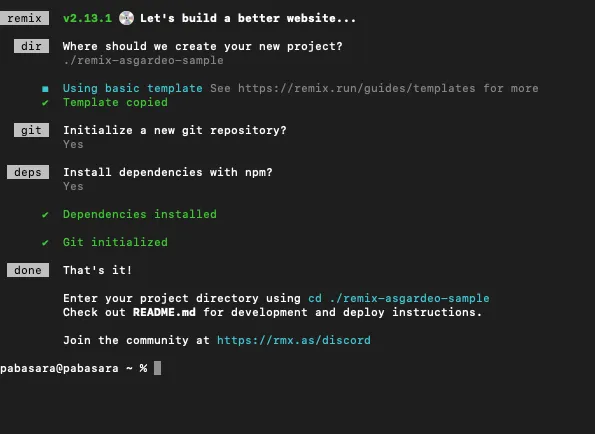
Running this command will generate a ready-to-use Remix project set up with TypeScript. Enter the project directory using the shown command and open it with your preferred code editor.
Now, you can run the application in development mode to see real-time updates and debug the app as you go. Run the following command in the root directory.
npm run dev
If all goes well, you should see the following result in the terminal and the app will start running on port 5173 by default.
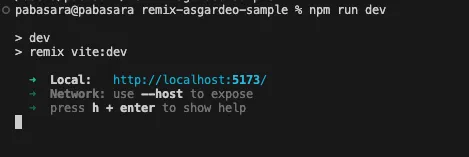
Go to http://localhost:5173 on your browser and confirm that everything is set up correctly.
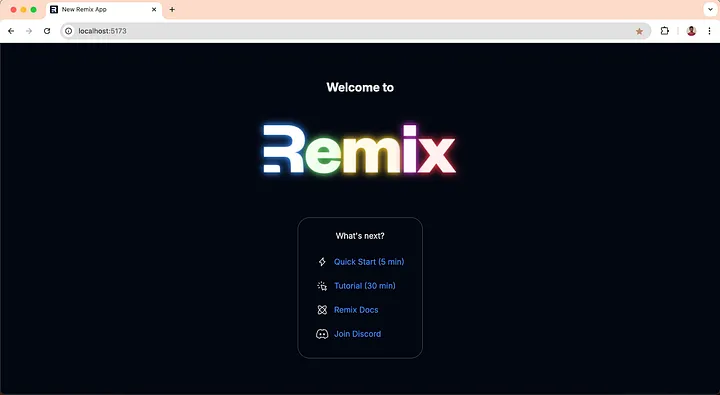
At this point, you have a simple yet functional Remix app. Next, we will integrate user authentication for the application.
In this guide, we will use Asgardeo as the Identity Provider (IdP). If you don’t have an Asgardeo account, you can sign up for a free one here. Asgardeo’s free tier provides more than enough resources for the app development phase.
Remix Auth is a complete open-source authentication solution for Remix.run applications. Heavily inspired by Passport.js, but it is completely rewritten from scratch to work on top of the Web Fetch API.
Remix Auth can be dropped into any Remix-based application with minimal setup.
We will use the Remix Auth strategy for Asgardeo to set up Asgardeo as the IdP for our Remix application.
Change the directory to the Remix project that you created in the previous section (cd ~/remix-asgardeo-sample) and run the following commands to install remix-auth and remix-auth-asgardeo.
npm install remix-auth
npm install @asgardeo/remix-auth-asgardeo
So far, we have created a sample Remix app. Next, let’s see how to integrate login functionality into our Remix application.
The OpenID Connect (OIDC) specification offers several methods, known as grant types, to obtain an access token in exchange for user credentials.
This example uses the authorization code grant type.
In this process, the app first requests a unique code from the authentication server, which can later be used to obtain an access token.
For more details on the authorization code grant type, please refer to the asgardeo documentation.
Asgardeo will receive this authorization request and respond by redirecting the user to a login page to enter their credentials. When the user authenticates successfully, Asgardeo will redirect the user back to the application with the authorization code. The application will then exchange this code for an access token and an ID token.
To integrate your application with Asgardeo, you first need to create an organization in Asgardeo and register your application.
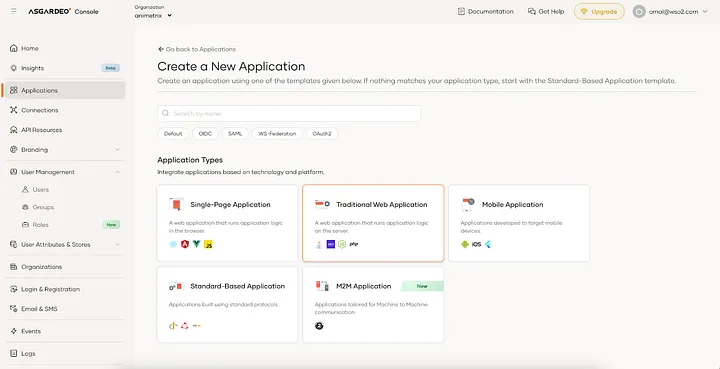
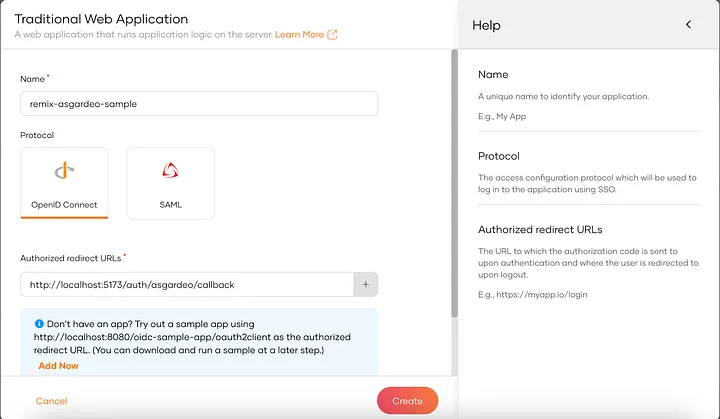
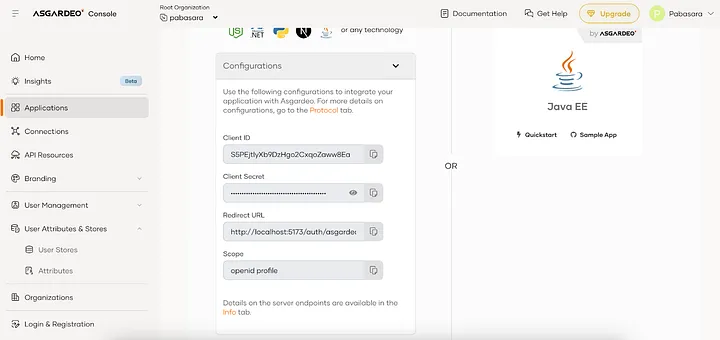
First let’s create the Asgardeo strategy instance by executing the following commands and adding the given content.
mkdir app/utils
touch app/utils/asgardeo.server.ts
Next let’s set up a login route for the application. Its content should be as below:
touch app/routes/login.tsx
Additionally, we need to set up the auth/asgardeo and auth/asgardeo/callback routes in the app/routes directory. Let’s create 2 new files as follows:
touch app/routes/auth.asgardeo.tsx
touch app/routes/auth.asgardeo.callback.tsx
Note how the redirects are configured in the app/routes/auth.asgardeo.callback.tsx file so that the user is redirected to the index page if the login is successful and to the login page if the login fails.
We need to make sure that only the login page is shown to the users before logging in and other pages are restricted. When a user is logged in, they can access other pages. To identify if a user is authenticated, we can use the isAuthenticated method from the Authenticator class.
Let’s modify the app/routes/_index.tsx file as follows to prevent unauthenticated users from accessing:
Now only authenticated users can access the index page. If a user is not authenticated, they will be redirected to the login page.
You can see that in files like app/routes/auth.logout.tsx and app/utils/asgardeo.server.ts we are using few environment variables with the prefix process.env._.
These environment variables contain information like client ID, client secret, and base url for Asgardeo login.
To configure the environment variables in your development environment, you can create the .env file in the root directory of your project and add the environment variable values from the Application you created in the Asgardeo console.
touch .env
Add the following content to the .env file.
ASGARDEO_CLIENT_ID=<client_id>
ASGARDEO_CLIENT_SECRET=<client_secret>
ASGARDEO_BASE_URL=https://api.asgardeo.io/t/<asgardeo_organization_name>
ASGARDEO_LOGOUT_URL=https://api.asgardeo.io/t/<asgardeo_organization_name>/oidc/logout
ASGARDEO_RETURN_TO_URL=http://localhost:5173/login
Make sure to replace the placeholders with the actual values.
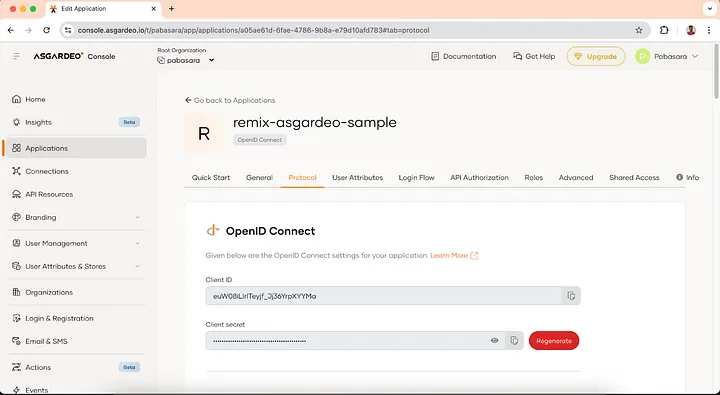
We will set up the auth/logout route in the application by creating a new file.
touch app/routes/auth.logout.tsx
And we will add a logout button to the index page. Let’s modify the app/routes/_index.tsx file as follows:
Now we can try the login and logout functionality in the application.
npm run dev
http://localhost:5173 on your browser and you will be redirected to the login page. When you click on the login button, you will be redirected to the Asgardeo login page.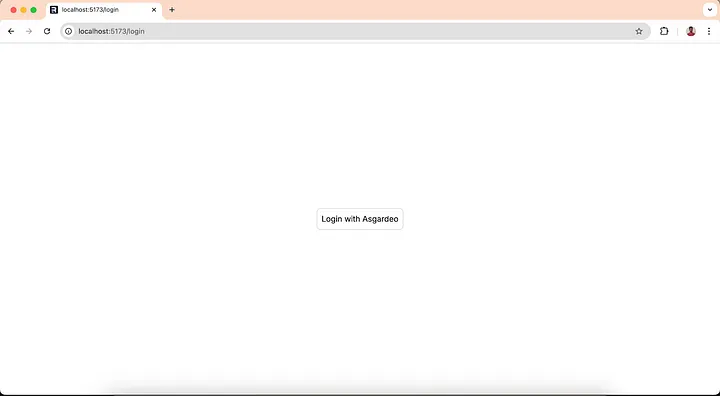
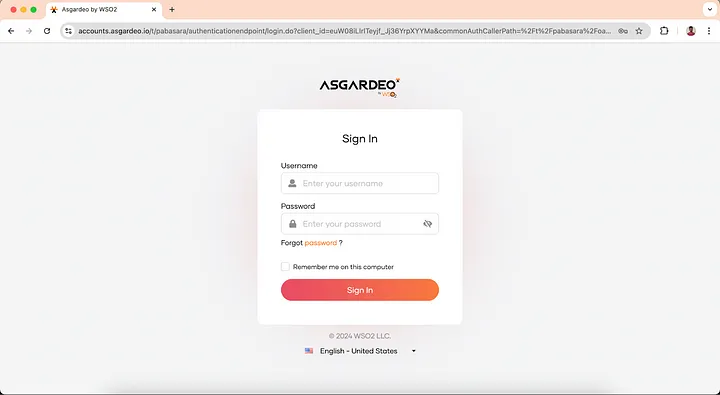
Login with the user you created previously and you will be redirected to the index page.
You can see the logout button at the end of the index page. Click on the logout button and you will be logged out from the application.
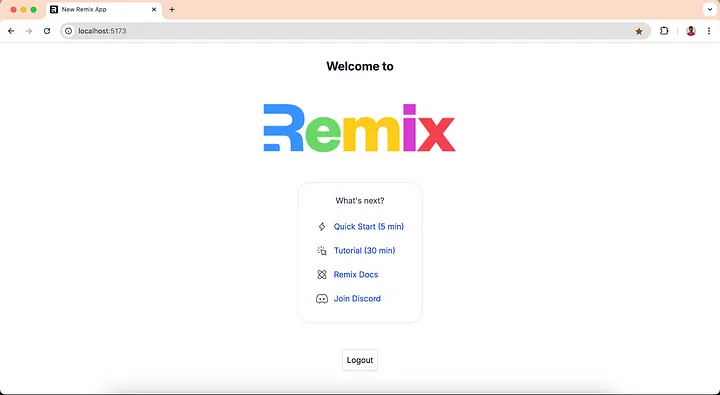
Now we have a functional Remix app with login and logout capabilities powered by Asgardeo!
After a user has authenticated with Asgardeo, the application might need to access the user information to provide a personalized experience.
In the next article, we will see how to access the required user information after authentication.
I have recently followed a course on Linkedin Learning titled Software Architecture: Patterns for Developers by Peter Morlion. In this course, I learned about the Command Query Responsibility Segregation (CQRS) pattern and I was interested to try it out in ASP.NET Core. In this article, I will walk you through my approach to implementing CQRS in a ASP.NET Core Web API project.
Command Query Responsibility Segregation (CQRS) is a software architectural pattern that separates the responsibility of reading and writing data. In a traditional application, we usually have a single model that is used to read and write data. CQRS introduces two separate models, one for reading data and one for writing data. The model for reading data (read model) is optimized for reading data and the model for writing data (write model) is optimized for writing data.
Let’s define Commands and Queries:
Why is this required? What possible benefits can be achieved by taking the effort to implement this pattern?
One of the main advantages of CQRS is the ability to scale the read and write operations independently. In traditional applications, scaling both operations together is necessary. Having the isolation between read and write models allows more flexibility and allows individual models to be updated without affecting the other. Additionally, implementing CQRS gives the ability to optimize the read model and write model separately for performance.
However, implementing CQRS comes with trade-offs.
One of the main disadvantages is the increased complexity of the system from this pattern. CQRS is not suitable for simple CRUD applications, as it would add unnecessary complexity to the system. It is best suited for complex business domains where the benefits of implementing CQRS outweigh the complexity it adds.
Another concern is maintaining the consistency between the read model and the write model. Additional effort is required to synchronize the data between the two models to ensure consistency. Eventual consistency is a common approach to handle this, where the read model is eventually consistent with the write model.
CQRS can also lead to code duplication and increased development time since there is an associated learning curve.
Now let’s dive into the implementation.
First, I built a simple CRUD application for managing contacts. The application has three entities: User, Contact, and Address. A user can have contacts of different types (email, phone, etc.) and addresses in different states.
You would see that a simple CRUD application like this does not have a use case for CQRS. However, we will use this application to demonstrate how CQRS can be implemented.
I created the domain models and a repository which uses an SQLite database to persist the data. Tables for each entity were created in the database.
public class User
{
    public string Id { get; set; }
    public string FirstName { get; set; }
    public string LastName { get; set; }
    public List<Contact> Contacts { get; set; }
    public List<Address> Addresses { get; set; }
}

public class Contact
{
    public string Id { get; set; }
    public string Type { get; set; }
    public string Detail { get; set; }
    public string UserId { get; set; }
}

public class Address
{
    public string Id { get; set; }
    public string City { get; set; }
    public string State { get; set; }
    public string Postcode { get; set; }
    public string UserId { get; set; }
}
public interface IUserRepository
{
    User Get(string userId);
    void Create(User user);
    void Update(User user);
    void Delete(string userId);
}
As you know, I can expose these simple CRUD operations from the repository as a service and use it in the ASP.NET Core controller. And our application would work just fine.
Instead, I need to separate the read and write operations into separate models to implement CQRS pattern in the application.
First I implemented the write side of the application.
I have defined two commands named CreateUserCommand and UpdateUserCommand. These commands are used to create the users and update their contacts and addresses.
public class CreateUserCommand
{
    public string FirstName { get; set; }
    public string LastName { get; set; }
}

    public class UpdateUserCommand
{
    public string Id { get; set; }
    public List<Contact> Contacts { get; set; }
    public List<Address> Addresses { get; set; }
}
To handle the write operations, I created a new repository UserWriteRepository based on the previous UserRepository implementation.
public interface IUserWriteRepository
{
    User Get(string userId);
    void Create(User user);
    void Update(User user);
    void Delete(string userId);
    Contact GetContact(string contactId);
    void CreateContact(Contact contact);
    void UpdateContact(Contact contact);
    void DeleteContact(string contactId);
    Address GetAddress(string addressId);
    void CreateAddress(Address address);
    void UpdateAddress(Address address);
    void DeleteAddress(string addressId);
}
Next I have implemented a service named UserWriteService which uses the UserWriteRepository to handle the write operations.
public interface IUserWriteService
{
    User HandleCreateUserCommand(CreateUserCommand command);
    User HandleUpdateUserCommand(UpdateUserCommand command);
}
And that completes the write side of the application.
Next we will implement the read side of the application. When it comes to the read operations, note that the data model should be independent of the write model and optimized only for reading data.
We need to define the read model suited to the read operations that we have in the application. In this ASP.NET Core application, end users should be able to get the contact details of a particular user according to the contact type, and the address of a particular user according to the state.
To achieve this, I have defined two queries:
public class ContactByTypeQuery
{
    public string UserId { get; set; }
    public string ContactType { get; set; }
}

    public class AddressByStateQuery
{
    public string UserId { get; set; }
    public string State { get; set; }
}
I will define two models UserAddress and UserContact to represent the read model.
public class UserAddress
{
    public string UserId { get; set; }
    public Dictionary<string, AddressByState> AddressByStateDictionary { get; set; }
}

    public class UserContact
{
    public string UserId { get; set; }
    public Dictionary<string, ContactByType> ContactByTypeDictionary { get; set; }
}
And I will create following database tables in the read model:
CREATE TABLE UserAddresses
(
    UserId NVARCHAR(255) NOT NULL,
    AddressByStateId NVARCHAR(255) NOT NULL,
    FOREIGN KEY(AddressByStateId) REFERENCES AddressByState(Id),
    PRIMARY KEY(UserId, AddressByStateId)
);

CREATE TABLE AddressByState
(
    Id NVARCHAR(255) PRIMARY KEY,
    State NVARCHAR(255) NOT NULL,
    City NVARCHAR(255) NOT NULL,
    Postcode NVARCHAR(255) NOT NULL
);

CREATE TABLE UserContacts
(
    UserId NVARCHAR(255) NOT NULL,
    ContactByTypeId NVARCHAR(255) NOT NULL,
    FOREIGN KEY(ContactByTypeId) REFERENCES ContactByType(Id),
    PRIMARY KEY(UserId, ContactByTypeId)
);

CREATE TABLE ContactByType
(
    Id NVARCHAR(255) PRIMARY KEY,
    Type NVARCHAR(255) NOT NULL,
    Detail NVARCHAR(255) NOT NULL
);
To handle the read operations, we need to define a new repository called UserReadRepository.
public interface IUserReadRepository
{
    UserContact GetUserContact(string userId);
    UserAddress GetUserAddress(string userId);
}
Next, I have implemented a service named UserReadService which uses the UserReadRepository to handle the read operations.
public interface IUserReadService
{
    ContactByType Handle(ContactByTypeQuery query);
    AddressByState Handle(AddressByStateQuery query);
}
Now we can read the required data from the read model tables and return the expected results.
But you’ll notice that the read model tables are empty and we didn’t add any data to them.
How do these read model tables get updated when a user is created or updated from the write model? To achieve this, we need to implement a mechanism to synchronize the data between the read and write models.
I have implemented a UserProjector to handle this synchronization.
public interface IUserProjector
{
    void Project(User user);
}
Ideally, this synchronization should be done asynchronously to avoid blocking the write operations. But for simplicity, I have called the project method synchronously in the UserWriteService.
public User HandleUpdateUserCommand(UpdateUserCommand command)
{
    User user = _userWriteRepository.Get(command.Id);
    user.Contacts = UpdateContacts(user, command.Contacts);
    user.Addresses = UpdateAddresses(user, command.Addresses);
    _userProjector.Project(user);
    return user;
}
With the synchronization in place, the read model tables will be updated whenever a user is updated.
And that completes the implementation of the CQRS pattern in the application.
The source code for this application can be found in the GitHub repo
Follow the below steps to run the application:
recreate-database.bat file to create the database tables.ContactBook.sln file in Visual Studio.In this article, my aim was to demonstrate how to implement the CQRS pattern in an ASP.NET Core application. In my next article, I will try to implement Event Sourcing along with CQRS in this application.
If you have any questions or feedback, please feel free to share.
Thank you for reading!
Monitoring of an application helps us to track aspects like resource usage, availability, performance and functionality. Azure Monitor is a service available in Microsoft Azure that delivers a comprehensive solution for collecting, analyzing, and acting on telemetry data from our environments.
Application Insights is an extension of Azure Monitor that provides Application Performance Monitoring both proactively and reactively. Today I’m going to tell you how you can easily use Azure Application Insights to monitor Java applications.
Please note that I have used WSO2 Identity Server in this article to demonstrate how to enable and configure Azure Application Insights for a Java Application.
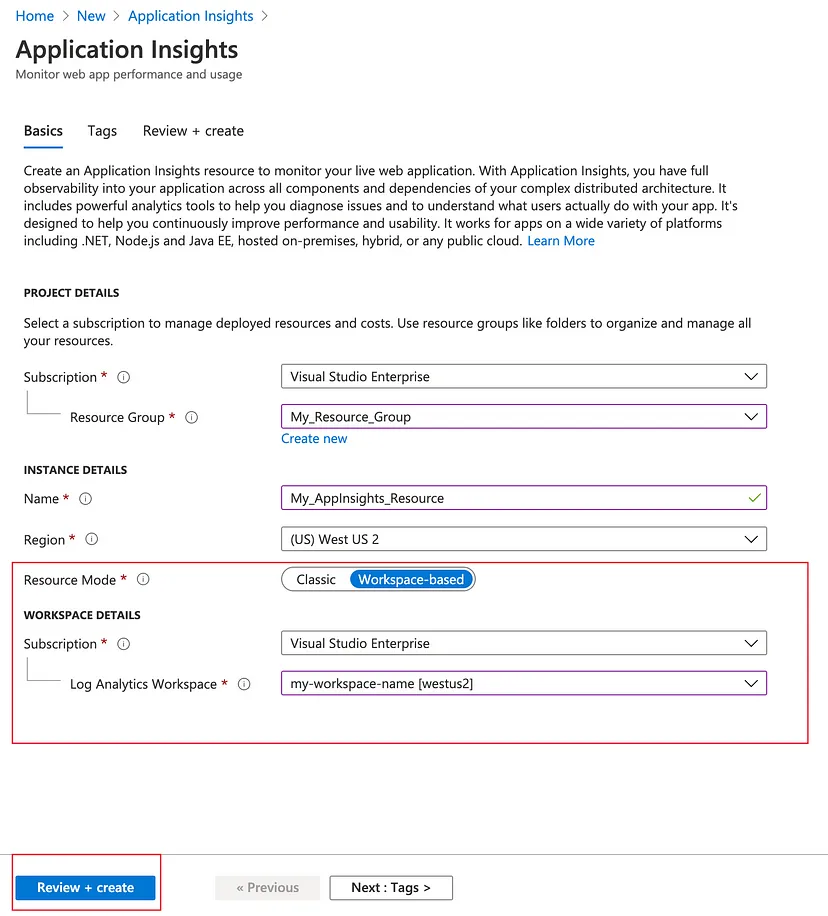

<CONNECTION_STRING> by the connection string copied above.{
"connectionString": "<CONNECTION_STRING>"
}
Next, download the Application Insights agent for Java from here. You should keep the applicationinsights-agent-x.x.x.jar file in the same directory as the applicationinsights.json file created above.
In our Java application, we should add a JVM argument as shown to point the JVM to the agent jar file. You need to update the path to the agent jar file.
-javaagent:"path/to/applicationinsights-agent-x.x.x.jar"
In my WSO2 Identity Server configuration, I have added the JVM argument in the
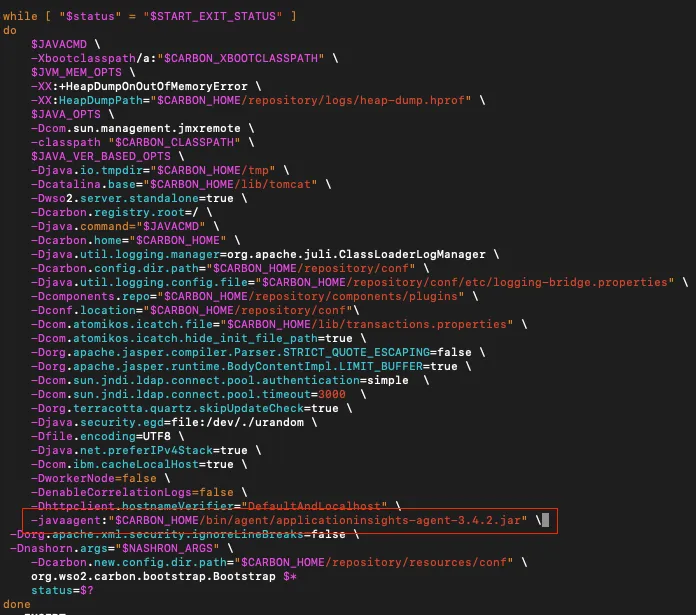

Now we can observe real time telemetry data from our Java application running on Azure through the Application Insights resource.
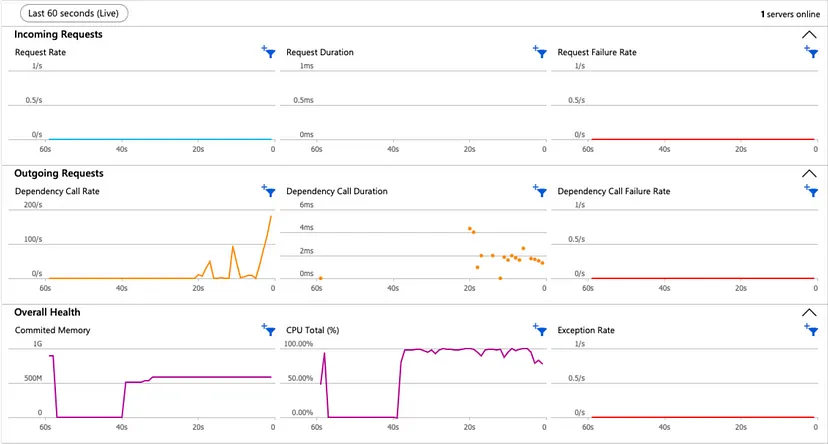
We can get information like CPU percentage, committed memory, request duration and request failure rate from Application Insights under Live Metrics.
Additionally, we can use features like Log Analytics, Availability tests and Alerting through Azure Application Insights. You can read more about Application Insights here.
Thank you for taking the time to read. Have a nice day!

Have you ever deployed WSO2 products in Azure virtual machines?
Today I’m going to tell you how you can easily run a cluster of WSO2 Identity Server on Azure virtual machines. To automatically discover the Identity Server nodes on Azure, we can use the Azure Membership Scheme.
Please note that this article is written based on using WSO2 Identity Server 5.11 with the Azure Membership Scheme. You can use the Azure Membership Scheme with other WSO2 products as well.
You can get a basic understanding about clustering in WSO2 Identity Server by reading this doc.
You can find the Azure Membership Scheme in this repository.
When a Carbon server is configured to use the Azure Membership Scheme, it will query the IP addresses in the given cluster using the Azure services during startup.
To discover the IP addresses, name of the Azure resource group where the virtual machines are assigned should be provided. After discovering, the Hazelcast network configuration will be updated with the acquired IP addresses. As a result, the Hazelcast instance will get connected to all the other members in the cluster.
In addition, when a new member is added to the cluster, all other members will get connected to the new member.
The following two approaches can be used for discovering Azure IP addresses.
Azure REST API is used to get the IP addresses of the virtual machines from the resource group and provide them to the Hazelcast network configuration.
Azure Java SDK is used to query the IP addresses of the virtual machines from the resource group and provide them to the Hazelcast network configuration.
By default, the Azure REST API will be used to discover the Azure virtual machines in the Azure Membership Scheme (If you want to use the Azure Java SDK to discover the Azure virtual machines, please refer to https://github.com/pabasara-mahindapala/azure-membership-scheme/blob/master/README.md).
Follow the given steps to use the Azure Membership Scheme.
azure-membership-scheme directorymvn clean install
azure-membership-scheme/target to the <carbon_home>/repository/components/lib directory of the Carbon server.azure-membership-scheme-1.0.0.jar
azure-membership-scheme/target/dependencies to the <carbon_home>/repository/components/lib directory of the Carbon server.azure-core-1.23.1.jar
content-type-2.1.jar
msal4j-1.11.0.jar
oauth2-oidc-sdk-9.7.jar
<carbon_home>/repository/conf/deployment.toml file.[clustering]
membership_scheme = "azure"
local_member_host = "127.0.0.1"
local_member_port = "4000"
[clustering.properties]
membershipSchemeClassName = "org.wso2.carbon.membership.scheme.azure.AzureMembershipScheme"
AZURE_CLIENT_ID = ""
AZURE_CLIENT_SECRET = ""
AZURE_TENANT = ""
AZURE_SUBSCRIPTION_ID = ""
AZURE_RESOURCE_GROUP = ""
AZURE_API_ENDPOINT = "https://management.azure.com"
AZURE_API_VERSION = "2021-03-01"
I have explained the parameters required to configure the Azure Membership Scheme below.
Microsoft.Network/networkInterfaces/read [1].eg: 53ba6f2b-6d52-4f5c-8ae0-7adc20808854
eg: NMubGVcDqkwwGnCs6fa01tqlkTisfUd4pBBYgcxxx=
eg: default
eg: 67ba6f2b-8i5y-4f5c-8ae0-7adc20808980
eg: wso2cluster
eg: https://management.azure.com
eg: 2021-03-01
If you have any suggestions or questions about the Azure Membership Scheme, don’t forget to leave a comment.
Have a nice day!